


Friday, October 19, 2012
Friday, October 12, 2012
In praise of Fall (aka a rambly updatey post)
(Steve and Edmund are napping, Harriet is out with the relatives, and I'm going to do something that I don't have to do.)
Plus, fall means that I can wear my favorite outfits in the whole wide world.


Who can resist the cozy comfort of cardigans, skinny jeans, and sneakers (or flats)? I can't. This is the time of year when my personal fashion taste flourishes...and I learn that successful self-portraits involve a tree branch and a large rock sort of wedged together.
Okay, enough about me and my seasonal euphoria. I realized that it's been a while since I talked about the kids in any sort of practical Real Life way, so here we go.


Oh Harriet. Where do I begin with Harriet? She is something else. I think we would call this era in Harriet's life the Terrible Twos, but it feels more like the Terrible Thirteens which has me quite scared for her hormonal pubescent state. OR, maybe she's getting it all out of her system now and that loverly transition into teenage-hood will be a walk in the park. Frankly, I'm just glad that she is our oldest child and that she came along when I was rather young and energetic and open to reading lots of things about how to deal with such strong personalities such as the one she possesses.
She cracks us up with her vocabulary.
Harriet: I fell off the couch and bumped my head.
Me: Oh, I'm very sorry to hear that!
Harriet: It's okay. I forgive you.
She is such a wonderfully sweet sister to Edmund and genuinely wants to get along with him. She is very consistent in "trading" toys with him when she wants whatever thing he has. She manages everybody and everything and eats lots of cheese and hummus. And milk. And homemade popcicles. And cauliflower pizza. She basically wants to spend every moment of every day either watching Veggie Tales (she knows more song lyrics than I do) or playing with the Small Aunts (who she can name in age order). Harriet can count to ten, match shapes and colors, find all of the circles in the house, and cut playdoh with a butterknife into teeny worms and chase me around with them.
Harriet is not confined to the popular notion of being a Princess, Cowgirl, Artist, or Mommy. Nope, she wants to excel at EVERYTHING. I think that if you aren't able to spend a lot of time with Harriet, but you want to know what she is really like, you should read the Olivia books by Ian Falconer. Because that is Harriet in literary pig form.

Then there is Edmund. Edmund is getting teeth in a big bad way and is so horribly pathetic that I can hardly bear it. When Harriet was getting teeth, she was just angry at the world. I was angry at her for being so out of this world unbearable, so there was a lot of general angst until the teeth popped through. With Edmund? He looks at me with these sad watery eyes and just moans. It's so sad. We spend a lot of time physically touching each other because that seems to help the tooth problem.
.jpg)
He isn't crawling yet, but he is dreadfully close. He seems to have adopted this stealth crawl thing where he quietly slides around the floor on his belly very quickly. He also used his stealth crawl to slide quickly off of the bed, which made his mother very upset.
Edmund loves textured food. While pureed stuff is okay, he would much rather chomp down on muffins, beans, or avocados. Like Harriet, he is a tremendous fan of cauliflower pizza. He has developed a bit of stranger anxiety, but continues to be a contented and easily pleased little guy. His smiles kill. I can't wait to see what they look like with some adorable teefies. I can't believe that he is going to be eight months old next week. Seriously?
(Okay, that was a wondrously refreshing forty-five minutes of silence and productivity. Now the pile of dishes really doesn't look so treacherous.)
Celebrate Fall Photo Challenge: RED

(Check out this super fun and low-stress photo challenge that celebrates my favourite season! Plus, I know the people who make the prizes and I can testify that the kettle corn will knock your socks off.)
Monday, October 8, 2012
Jake and the Neverland Pirates costume
A lady called me back in September and asked if I could make a Jake and the Neverland Pirates costume for her grandson, who is turning three years old, and is rather batty about this television show. I had no idea what Jake and the Pirates was or what the Jake character looked like, but I agreed to make the costume. Hey, I like to research and create an accurate, complete "look," so even though I knew I would have to squeeze sewing into a busy schedule, I also knew that it would be fun.
So that's what the character looks like. And here is Harriet modeling the finished costume:


The birthday boy is a little taller than Harriet, so the costume is slightly big on her. But I think she makes a pretty adorable pirate. (Even if she refused to make a pirate-y face, the silly girl.)

As you can see, I just took a purchased white shirt, and cut the sleeves and neckline to make them look all raggedy. Then I added a cross-stitched tie out of black yarn. I made the blue elastic waist pants from this super-duper snazzy tutorial*.

The belt is tube made from grey knit fabric and made adjustable with a D-ring closure.

Bandanna? Easy peasy. I cut a strip of red knit about 7"x30" and serged the edges.


I was shocked at how quickly the costume came together and how cute the finished project turned out to be. I hope my client's grandson is happy!
*I seriously can't say enough happy things about this pants tutorial. They work every time, people. Every time! Not only do they come together in about thirty minutes, but they are so versatile. Love!
 |
| Source |


The birthday boy is a little taller than Harriet, so the costume is slightly big on her. But I think she makes a pretty adorable pirate. (Even if she refused to make a pirate-y face, the silly girl.)

As you can see, I just took a purchased white shirt, and cut the sleeves and neckline to make them look all raggedy. Then I added a cross-stitched tie out of black yarn. I made the blue elastic waist pants from this super-duper snazzy tutorial*.

The belt is tube made from grey knit fabric and made adjustable with a D-ring closure.

Bandanna? Easy peasy. I cut a strip of red knit about 7"x30" and serged the edges.

The vest was also really simple and loads of fun to make, thanks to this loverly tutorial. I made a slight modification to the pattern in that I extended the front straight out from the neckline to create the collar. I made the vest out of blue felt and finished the edges with gold metallic bias binding. (Putting on the binding was not as easy as I anticipated, since the thickness of the felt caused the binding to pull unevenly. Just a warning.) The huge gold buttons definitely make it look all pirate-y.

I was shocked at how quickly the costume came together and how cute the finished project turned out to be. I hope my client's grandson is happy!
*I seriously can't say enough happy things about this pants tutorial. They work every time, people. Every time! Not only do they come together in about thirty minutes, but they are so versatile. Love!
Tuesday, October 2, 2012
DIY: Lover's Knot Crocheted Scarf
This post really needs to be subtitled: Amelia's Very First Attempt At Creating a Tutorial. I've been wanting to do a tutorial for just...well, forever. But whenever I get these great ideas for a little DIY wonderfulness, I get so caught up in the project that I end up with no decent in-progress pictures.


Or, I decide that actually finishing a craft project before the kids start screaming again is of more value to my general sanity than photographing it for the world to see.
I'm pretty sure the latter scenario is more common than the former, but it doesn't really matter because this time I remembered to take pictures. And write instructions. And take pictures. This may be the first and last tutorial I ever write, but it feels really good to be actually doing it. It also feels very scary and, in fact, my hands are shaking as I type.
Okay, no more blah-blah-Amelia's-psychoanalysis.
Lover's Knot Crocheted Scarf Tutorial
Back Story
I saw this lovely image of a scarf on Pinterest using a very lacy stitch and I thought it was gorgeous. (I was also desperate to do something creative after several weeks of severe crafting famine thanks to sick children and a much too busy schedule.)
 |
| Source |
Hoooowwwwever, when you go to the blog on which this stitch is featured you will soon realize that the instructions are in...Dutch. Helpful for all of the Dutch-speaking crocheters out there, but for me? Not so much. After browsing around the internets I found some instructions for this stitch - it's called the Lover's Knot - and discovered that it was so fun and easy that I should make a tutorial.
What you need:
- Worsted weight yarn (I had some leftover Lion Wool in Pumpkin from Lions Brand Yarn)
- Crochet hook size F
- A long lazy afternoon
How to make it happen:
NOTE: Every 15 chain stitches results in 4" of scarf width. You can increase or decrease your width by adding or subtracting 15 chain stitches and then adding 1 extra chain for the first turn. For example, I chained 30 stitches and added 1 for a total of 31 stitches = 8" wide scarf.
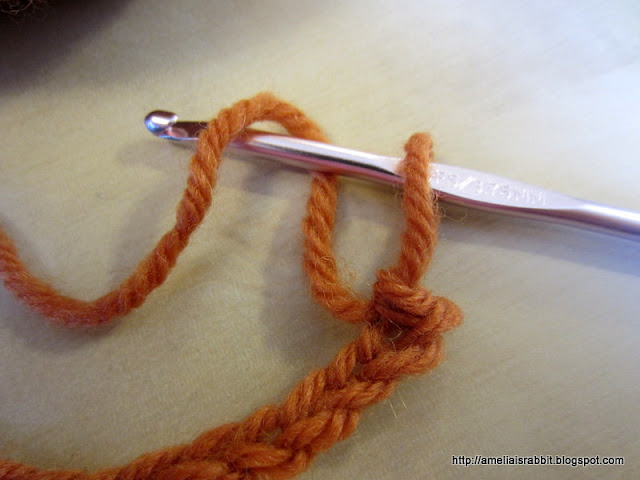
1. Chain (ch) 31.

2. Single (sc) crochet in second ch from hook. Draw up the yarn out of the sc until it is about an inch high. Yarn over (yo).


3. Pull through the large loop of yarn. Now, if you look at the picture, you can see that there is the original 1" loop on the right, and a second strand of yarn on the left. Got that?

4. Insert the hook between the original 1" loop and the new strand of yarn, yo and draw up a loop so that you have two loops of yarn on your hook. As shown.


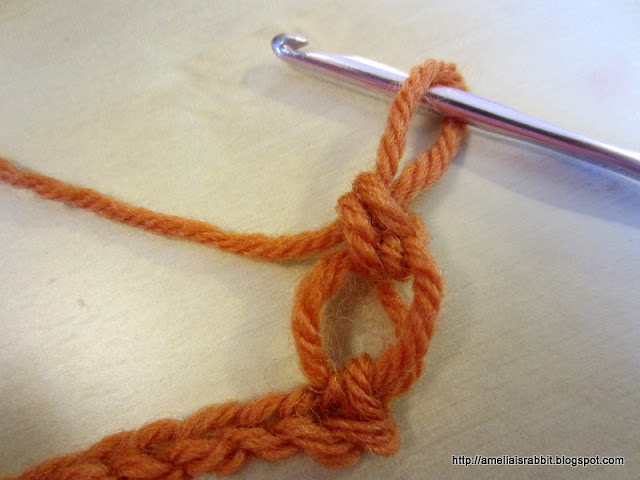
5. Yo and draw through both loops on hook.

6. So, you should have something that looks like this. Essentially what you have done is made a really large ch and then crocheted a sc through the large chain. Make sense?

7. Draw up another 1" loop, right on top of the stitch you just made, and repeat steps 3-6 so that you have two lover's knot (lk) stitches on on top of each other.


8. Skip four chs and sc in the next ch. You've now created a lk loop. See? That wasn't so hard.

9. Continue to work lk loops down the ch until you reach the end.

10. Make two lk and turn.

11. Insert hook into the top of the center stitch of the lk that you made on the previous row. (It's the loopy bit that sticking up there with an arrow pointing to it.)
12. Slip stitch.
13. Make two lk, slip stitch in the top of the next lk loop and away you go!
14. Keep making lk loops back and forth until you reach the length of scarf you desire.
15. When you reach the end of your final row (I crocheted until I nearly ran out of yarn), make only one lk and then crochet 4 ch.
16. Slip stitch in the top of the center of the lk loop that you made on the previous row.
17. Ch 4 and repeat until you reach the end of the scarf. Finish off and weave in the ends.
The finished product:
Now, if my instructions made any sense at all, you should end up with a lovely, lacy, super-textured scarf that is perfect for those fall days that start out all chilly and end up sunny and warm.


The End.
Wednesday, September 19, 2012
BFIAR: The Little Rabbit
Harriet and I started doing a very loosely-scheduled version of Before Five in a Row a few weeks ago. Our first book was Jesse Bear, What Will You Wear?, which was a tremendous hit and involved many many readings and many hours of related activities. It was a fabulous way to start, but I don't have any photographic evidence. Drat.
HOWEVER. This week we jumped to The Little Rabbit and it has also been loads of fun. We have talked about different colors of rabbits (white, grey, brown) and read many other rabbit-related books and we made rabbit cookies.

I'm trying to do more involved projects on the days that Steve is home, so I got E down for a nap and we started baking.

I was so super-duper excited to find a scan of Cookie Monster's Cookie Dough recipe online because Mom and I used to make it when I was little...and it just works. Every time. Always.

After letting the dough chill for an hour, Harriet was back at it with her rabbit cookie cutter.


(I think the green looks a little freaky, but whatever.) I couldn't find our paintbrushes, but a clean pipe cleaner works great, too.

H must get every last bit of dough licked out of the bowl.


YAY! It's a finished green-eyed-monster rabbit cookie! This was a fun project to do together.

Meanwhile, E ate apples and mixed berries.

The End.

In other news, my children have been dealing with some weird little virus which results in general Crabbiness, Low-Fevers, and Sleepless Nights. This results in a rather frazzled Amelia. But there is a date night on the horizon!
Subscribe to:
Posts (Atom)