Or, I decide that actually finishing a craft project before the kids start screaming again is of more value to my general sanity than photographing it for the world to see.
I'm pretty sure the latter scenario is more common than the former, but it doesn't really matter because this time I remembered to take pictures. And write instructions. And take pictures. This may be the first and last tutorial I ever write, but it feels really good to be actually doing it. It also feels very scary and, in fact, my hands are shaking as I type.
Okay, no more blah-blah-Amelia's-psychoanalysis.
Lover's Knot Crocheted Scarf Tutorial
Back Story
I saw this lovely image of a scarf on Pinterest using a very lacy stitch and I thought it was gorgeous. (I was also desperate to do something creative after several weeks of severe crafting famine thanks to sick children and a much too busy schedule.)
 |
| Source |
Hoooowwwwever, when you go to the blog on which this stitch is featured you will soon realize that the instructions are in...Dutch. Helpful for all of the Dutch-speaking crocheters out there, but for me? Not so much. After browsing around the internets I found some instructions for this stitch - it's called the Lover's Knot - and discovered that it was so fun and easy that I should make a tutorial.
What you need:
- Worsted weight yarn (I had some leftover Lion Wool in Pumpkin from Lions Brand Yarn)
- Crochet hook size F
- A long lazy afternoon
How to make it happen:
NOTE: Every 15 chain stitches results in 4" of scarf width. You can increase or decrease your width by adding or subtracting 15 chain stitches and then adding 1 extra chain for the first turn. For example, I chained 30 stitches and added 1 for a total of 31 stitches = 8" wide scarf.
1. Chain (ch) 31.
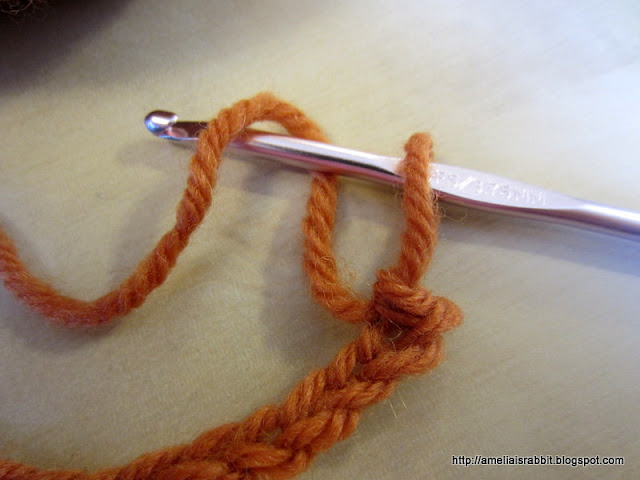
2. Single (sc) crochet in second ch from hook. Draw up the yarn out of the sc until it is about an inch high. Yarn over (yo).
3. Pull through the large loop of yarn. Now, if you look at the picture, you can see that there is the original 1" loop on the right, and a second strand of yarn on the left. Got that?
4. Insert the hook between the original 1" loop and the new strand of yarn, yo and draw up a loop so that you have two loops of yarn on your hook. As shown.
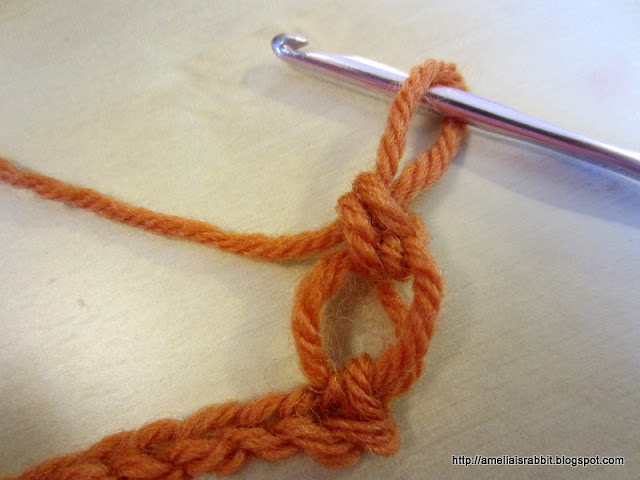
5. Yo and draw through both loops on hook.
6. So, you should have something that looks like this. Essentially what you have done is made a really large ch and then crocheted a sc through the large chain. Make sense?
7. Draw up another 1" loop, right on top of the stitch you just made, and repeat steps 3-6 so that you have two lover's knot (lk) stitches on on top of each other.
8. Skip four chs and sc in the next ch. You've now created a lk loop. See? That wasn't so hard.
9. Continue to work lk loops down the ch until you reach the end.
10. Make two lk and turn.
11. Insert hook into the top of the center stitch of the lk that you made on the previous row. (It's the loopy bit that sticking up there with an arrow pointing to it.)
12. Slip stitch.
13. Make two lk, slip stitch in the top of the next lk loop and away you go!
14. Keep making lk loops back and forth until you reach the length of scarf you desire.
15. When you reach the end of your final row (I crocheted until I nearly ran out of yarn), make only one lk and then crochet 4 ch.
16. Slip stitch in the top of the center of the lk loop that you made on the previous row.
17. Ch 4 and repeat until you reach the end of the scarf. Finish off and weave in the ends.
The finished product:
Now, if my instructions made any sense at all, you should end up with a lovely, lacy, super-textured scarf that is perfect for those fall days that start out all chilly and end up sunny and warm.


